
Introduction to Butterfinger Balls
I still remember the first time I made Butterfinger Balls. It was around the holidays, and my kitchen was a complete mess—chocolate drips everywhere, crushed candy dust coating the countertops, and my little nephew sneaking bites when he thought I wasn’t looking. But when we finally bit into those crunchy, peanut-buttery delights, all the chaos was worth it. These treats were everything I love about Butterfinger bars, but in a bite-sized, no-bake form.
If you are a fan of peanut butter, chocolate, and crunchy goodness, then Butterfinger Balls are about to be your new favorite dessert. Whether you are making them for the holidays, a party, or just a midnight snack, this recipe is quick, easy, and dangerously delicious.
What Are Butterfinger Balls?
Think of Butterfinger Balls as the best part of a Butterfinger bar turned into a bite-sized treat. They combine the classic crunchy peanut butter flavor of Butterfinger candy with creamy peanut butter and a smooth chocolate coating. The result is a dessert that melts in your mouth but still gives you that satisfying crunch.
They are similar to peanut butter truffles but with an added crunchy twist. Plus, they are no-bake, meaning you do not need an oven—just mix, roll, and dip in chocolate.
History & Popularity of Butterfinger-Inspired Desserts
Butterfinger candy bars have been around since 1923, making them a classic treat loved for generations. Their crispy peanut butter core and chocolate coating have inspired countless desserts, including Butterfinger cheesecakes, Butterfinger cupcakes, and, of course, Butterfinger Balls.
These bite-sized delights became popular because they are:
- Easy to make with no baking required
- Perfect for parties, as they disappear fast
- Customizable with different coatings and mix-ins
- Great for using up leftover Butterfingers
Whether you are a long-time Butterfinger fan or just looking for a new no-bake treat, these will be a hit.
Why You’ll Love This Recipe
If you need more convincing, here are a few reasons why Butterfinger Balls deserve a spot in your dessert lineup:
- No oven required—just mix, roll, dip, and chill
- Minimal ingredients—most of them are pantry staples
- Perfect balance of creamy and crunchy textures
- A treat that both kids and adults will love
Ingredients Needed for Butterfinger Balls
Main Ingredients:
- 2 cups crushed Butterfinger candy bars (about 6 full-sized bars)
- 1 cup creamy peanut butter (preferably not the natural kind, for best texture)
- 2 cups powdered sugar (for sweetness and binding)
- 4 tablespoons butter, softened
- 2 cups chocolate chips (semi-sweet or milk chocolate)
- 1 tablespoon coconut oil (optional, helps smooth out melted chocolate)
Optional Additions for Extra Flavor:
- ¼ teaspoon salt to enhance flavor
- ½ teaspoon vanilla extract for depth
- White or dark chocolate for drizzling
- Chopped nuts for an extra crunch
- Caramel drizzle for a gooey surprise
Step-by-Step Guide to Making Butterfinger Balls
1. Prepping the Ingredients
- Crush the Butterfinger bars using a food processor for fine crumbs or place them in a zip-top bag and crush them with a rolling pin for a chunkier texture.
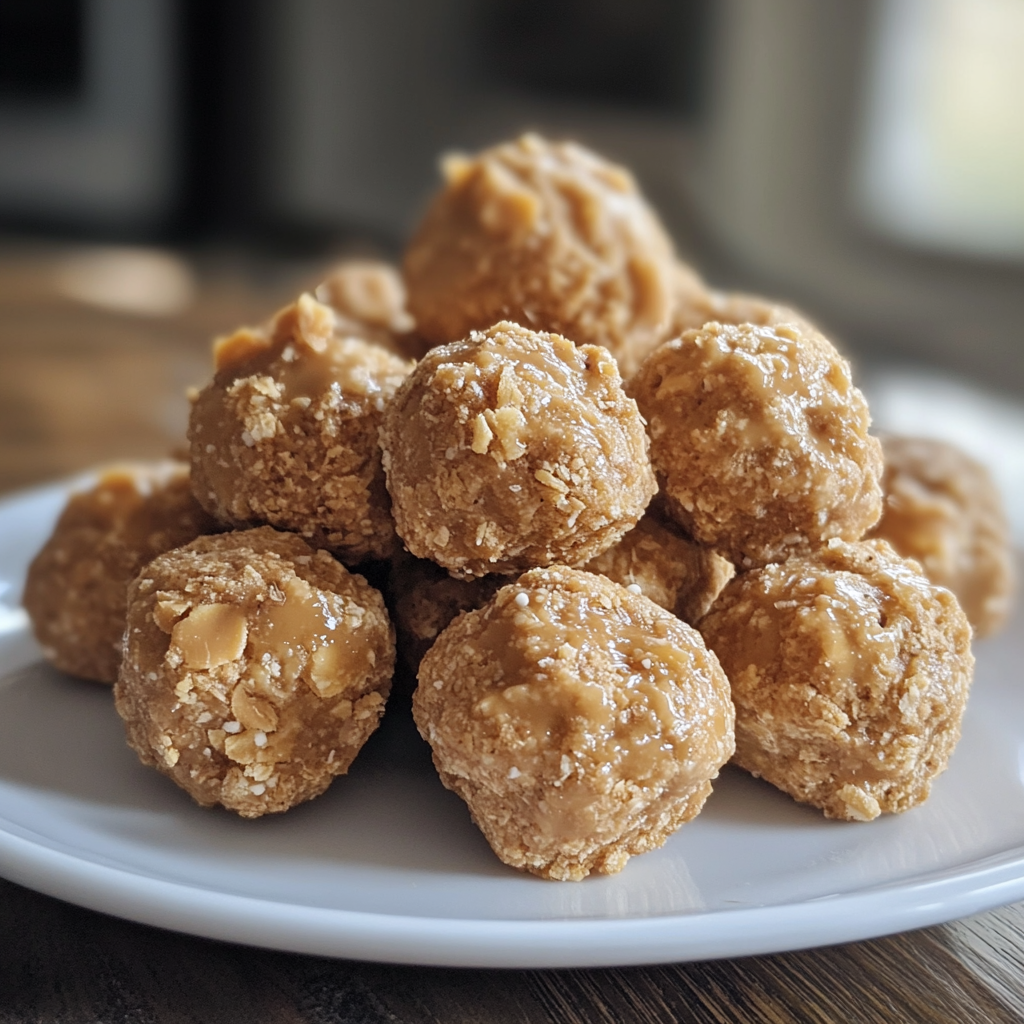
- In a large bowl, mix together the peanut butter, softened butter, powdered sugar, and crushed Butterfinger pieces. Stir until well combined and forms a dough-like consistency.
2. Mixing & Forming the Balls
- Roll the mixture into one-inch balls and place them on a parchment-lined baking sheet.
- If the mixture feels too sticky, chill it in the fridge for about fifteen to twenty minutes before rolling.
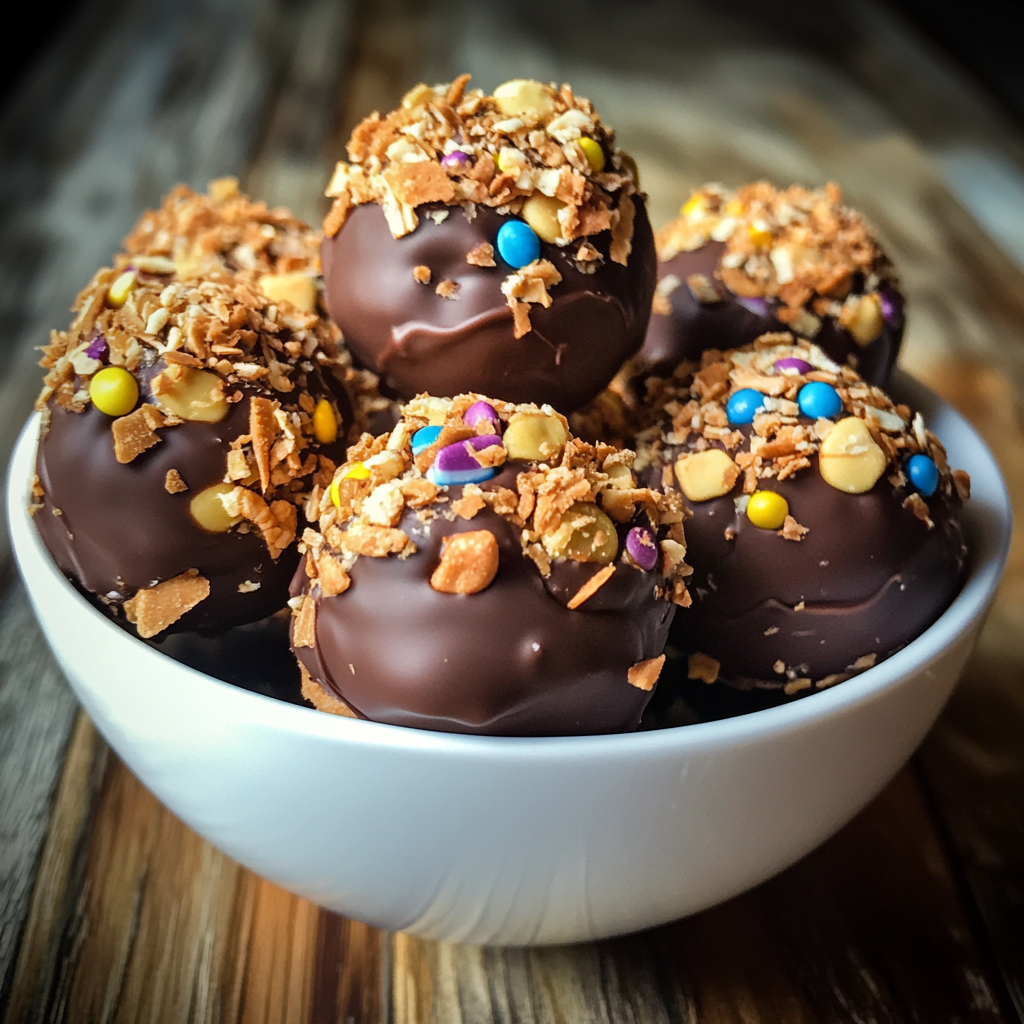
3. Coating Options (Chocolate, Nuts, etc.)
- Melt the chocolate chips in a microwave-safe bowl in thirty-second intervals, stirring each time, until smooth. If using coconut oil, stir it in for a glossy finish.
- Using a fork or toothpick, dip each Butterfinger Ball into the melted chocolate. Tap off the excess and place it back on the parchment paper.
- For added variety, drizzle with white chocolate, sprinkle with crushed nuts, or dust with sea salt for a sweet-salty contrast.
4. Let Them Set & Enjoy
- Place the dipped balls in the fridge for at least thirty minutes to firm up.
- Once set, they are ready to eat.
Tools & Equipment Required
No special equipment is needed, just a few basic kitchen tools:
- Mixing bowls for combining ingredients
- Silicone spatula to help mix everything smoothly
- Rolling pin or food processor for crushing Butterfingers
- Fork or toothpick to help dip the balls into melted chocolate
- Parchment paper to prevent sticking
How to Store Butterfinger Balls
To keep them fresh and delicious, here is how to store them:
- In the fridge – Store in an airtight container for up to two weeks. They stay firm and taste just as good, if not better, after chilling.
- In the freezer – Place them in a freezer-safe container or zip-top bag, separating layers with parchment paper. They will last up to three months. Let them sit at room temperature for a few minutes before eating.
- At room temperature – If serving them at a party, they can sit out for a few hours, but after that, it is best to refrigerate them so the chocolate does not melt.
Butterfinger Balls Recipe : Variations, Customizations, and Expert Tips
Now that you know the basics of making Butterfinger Balls, let’s explore different ways to customize the recipe, including healthier options, creative mix-ins, and fun holiday variations.
Recipe Variations & Customizations
Butterfinger Balls are already a delicious treat, but there are plenty of ways to modify the recipe to match different tastes and dietary needs. Whether you want a healthier version, a unique flavor combination, or a festive twist, here are some great ideas to try.
No-Bake vs. Baked Versions
One of the best things about this recipe is that it is completely no-bake, making it quick and easy. However, if you prefer a firmer texture, a baked version is possible.
- No-Bake Version – The standard recipe requires only mixing and chilling, resulting in a smooth, truffle-like texture with a slight crunch.
- Baked Version – If you want a firmer, cookie-like texture, try baking the Butterfinger Balls at 325°F for about eight to ten minutes. This method will slightly caramelize the sugars and create a more structured treat.
Healthier Alternatives & Substitutions
For those looking to lighten up the recipe, here are a few substitutions to make Butterfinger Balls slightly healthier.
- Swap out the peanut butter – Use natural peanut butter (with no added sugar) or almond butter for a cleaner alternative.
- Reduce sugar – Instead of powdered sugar, try using finely ground coconut sugar or a sugar-free powdered sweetener.
- Healthier chocolate – Use dark chocolate instead of milk chocolate for a less sweet but richer coating.
- Gluten-free option – Most Butterfinger bars are already gluten-free, so just ensure your powdered sugar and other ingredients are certified gluten-free.
- Dairy-free option – Use dairy-free chocolate chips and replace butter with coconut oil.
While these substitutions slightly change the taste, they still deliver a delicious result.
Adding Different Coatings (White Chocolate, Dark Chocolate, etc.)
Chocolate plays a major role in Butterfinger Balls, and there are many ways to mix it up.
- Milk chocolate – The classic choice, delivering the signature Butterfinger taste.
- Dark chocolate – Adds a rich, slightly bitter contrast that complements the peanut butter filling.
- White chocolate – A sweeter, creamier alternative that pairs well with caramel or nuts.
- Peanut butter drizzle – Enhances the peanut flavor and adds a decorative touch.
- Crushed nuts or sprinkles – Rolling the balls in chopped peanuts, almonds, or festive sprinkles adds texture and a fun twist.
For a visually striking presentation, drizzle the balls with a contrasting chocolate color.
Mix-Ins: Peanut Butter, Caramel, & More
Adding extra ingredients to the filling can create new flavors and textures.
- Mini chocolate chips – A little extra chocolate inside the filling makes them even more indulgent.
- Caramel bits – Adding soft caramel chunks inside the mixture creates a gooey surprise.
- Sea salt – A pinch of sea salt balances the sweetness and enhances the peanut butter flavor.
- Chopped pretzels – Mixing in crushed pretzels adds a salty crunch.
- Shredded coconut – For a slight tropical twist, mix in unsweetened coconut flakes.
These small additions take Butterfinger Balls to a whole new level.
Gluten-Free & Dairy-Free Options
Butterfinger Balls can easily be modified for gluten-free and dairy-free diets without sacrificing taste.
- Gluten-Free Version – Most Butterfinger bars are already gluten-free, so just use gluten-free chocolate chips and double-check that your other ingredients, like powdered sugar, are free from cross-contamination.
- Dairy-Free Version – Use dairy-free chocolate chips and swap the butter for coconut oil or vegan butter.
These adjustments allow everyone to enjoy this delicious treat without worry.
Holiday & Seasonal Variations
Butterfinger Balls are perfect for special occasions, and a few simple changes can make them festive for any holiday.
- Christmas – Add red and green sprinkles, drizzle with white chocolate, or roll them in crushed peppermint candy.
- Halloween – Use orange candy melts for dipping and add spooky sprinkles.
- Valentine’s Day – Shape them into hearts and coat them with pink or white chocolate.
- Easter – Roll them in pastel-colored sprinkles or shape them into mini egg shapes.
Seasonal twists make them an easy and fun addition to any celebration.
Serving Suggestions & Pairings
Butterfinger Balls can be enjoyed on their own, but pairing them with other desserts or drinks makes them even better.
- With ice cream – Serve them alongside vanilla or chocolate ice cream for a decadent treat.
- With coffee – The chocolate-peanut butter combination pairs beautifully with a cup of coffee or espresso.
- On a dessert platter – Arrange them with other bite-sized sweets like brownies, cookies, or chocolate truffles for an impressive party platter.
- Dipped in hot chocolate – Drop one into a cup of warm hot cocoa for a rich, peanut buttery surprise.
These simple pairings enhance the overall dessert experience.
Tips for Making the Best Butterfinger Balls
To ensure the best possible results, here are some expert tips for making perfect Butterfinger Balls every time.
Preventing Stickiness
Peanut butter and powdered sugar can get messy. If the mixture feels too sticky:
- Chill the mixture for fifteen to twenty minutes before rolling.
- Lightly dust your hands with powdered sugar before shaping the balls.
- If the mixture is too soft, add a little more powdered sugar to firm it up.
Achieving the Perfect Texture
The right balance of smoothness and crunch is key.
- Crush the Butterfinger bars finely if you prefer a smoother texture.
- Leave some larger chunks for extra crunch.
- Melt the chocolate properly – Use a microwave in short intervals or a double boiler to prevent burning.
Getting a Smooth Chocolate Coating
Dipping the Butterfinger Balls in chocolate can get messy, but these tricks help:
- Use a fork or toothpick to dip and remove excess chocolate.
- Tap gently to remove extra chocolate before placing it on parchment paper.
- If the chocolate thickens while dipping, reheat it in short intervals to keep it smooth.
Following these tips ensures that the final product looks as good as it tastes.
Butterfinger Balls are a versatile, easy-to-make treat that can be adapted in so many ways. Whether you prefer them classic, healthier, or customized for a holiday, there are endless possibilities.
FAQs, Troubleshooting, and Final Thoughts:
In this final section, we will cover frequently asked questions, common troubleshooting tips, ways to scale the recipe for large batches, and some creative serving ideas. If you have ever wondered how long Butterfinger Balls last, whether you can freeze them, or how to make them look extra impressive, this part has you covered.
How Long Do Butterfinger Balls Last?
Butterfinger Balls have a decent shelf life if stored properly.
- At room temperature: They can last for about three to four days if kept in a cool, dry place. However, they may start to soften, especially in warmer temperatures.
- In the refrigerator: When stored in an airtight container, Butterfinger Balls stay fresh for up to two weeks. The chocolate coating keeps them firm, and the peanut butter filling remains creamy.
- In the freezer: Butterfinger Balls freeze exceptionally well. Place them in a freezer-safe container with parchment paper between layers, and they will last for up to three months. Thaw at room temperature before serving.
Can You Freeze Butterfinger Balls?
Yes, freezing is a great way to extend their shelf life, especially if you want to make them ahead of time.
How to freeze Butterfinger Balls properly:
- Place the chocolate-coated balls on a baking sheet lined with parchment paper.
- Freeze them for about one hour, or until firm.
- Transfer the frozen balls to an airtight container or freezer bag, placing parchment paper between layers to prevent sticking.
- When ready to eat, remove from the freezer and let them thaw for five to ten minutes before serving.
Freezing Butterfinger Balls does not affect their texture or flavor, making this an excellent option for meal prep or holiday treats.
Troubleshooting Common Issues
The Mixture is Too Sticky to Roll
- This usually happens if the peanut butter is too soft or warm.
- Refrigerate the mixture for fifteen to twenty minutes before rolling.
- Dust your hands with powdered sugar or lightly grease them with butter to prevent sticking.
The Chocolate Coating is Too Thick or Clumpy
- If melted chocolate is too thick, stir in one tablespoon of coconut oil or vegetable shortening to thin it out.
- Melt chocolate in thirty-second intervals in the microwave, stirring between each session to prevent burning.
- Use a fork or toothpick to dip the Butterfinger Balls, tapping off excess chocolate for a smooth finish.
Butterfinger Balls are Too Hard After Chilling
- If they feel too firm after refrigeration, let them sit at room temperature for five to ten minutes before serving.
- Adding one extra tablespoon of peanut butter can create a softer texture if you prefer a creamier center.
Scaling the Recipe for Large Batches
Butterfinger Balls are a great make-ahead treat for parties, holiday gatherings, or bake sales. Scaling up the recipe is easy.
For a double batch:
- Simply double all the ingredients, but mix in two separate bowls to ensure even distribution.
For a triple batch or more:
- Use a stand mixer for easier blending.
- Crush the Butterfinger bars in larger batches using a food processor.
- Melt the chocolate in small portions to prevent it from hardening before you finish dipping.
Making larger batches requires a bit more space and time, but the results are well worth it.
Fun Ways to Serve & Present Butterfinger Balls
Butterfinger Balls are delicious on their own, but a few extra touches can make them even more appealing for special occasions.
Gift-Worthy Packaging Ideas
- Place them in decorative tins or small gift boxes lined with parchment paper.
- Wrap each Butterfinger Ball in mini cupcake liners and arrange them in a clear bag tied with a ribbon.
- Use a mason jar and fill it with Butterfinger Balls for a cute and creative edible gift.
Creative Plating & Presentation
- Serve them on a tiered dessert tray alongside truffles and cookies for a dessert buffet.
- Arrange them in a circle around a bowl of peanut butter dipping sauce for an extra indulgent touch.
- Drizzle melted white and dark chocolate over the top for an elegant finish.
Using Leftover Butterfinger Candy in Other Desserts
If you have extra Butterfinger bars, here are some delicious ways to use them:
- Butterfinger Milkshake – Blend with vanilla ice cream and milk for a crunchy peanut butter shake.
- Butterfinger Cheesecake Topping – Crush and sprinkle over cheesecake for added crunch.
- Butterfinger Brownies – Stir chopped Butterfinger pieces into brownie batter before baking.
- Butterfinger Ice Cream Sundae – Add crushed Butterfinger to ice cream with caramel and whipped cream.
Nutritional Information & Caloric Breakdown
While Butterfinger Balls are a treat, it’s always helpful to know the approximate nutritional values.
Per serving (one Butterfinger Ball, based on standard ingredients):
- Calories: 180-200
- Total fat: 10g
- Saturated fat: 4g
- Sugar: 15g
- Protein: 3g
- Carbohydrates: 20g
For a lower-calorie option, use dark chocolate, reduce the powdered sugar, and opt for natural peanut butter.
Comparing Homemade vs. Store-Bought Versions
Many grocery stores sell Butterfinger-inspired desserts, but homemade Butterfinger Balls have distinct advantages.
- Fresher ingredients – No preservatives or artificial flavors.
- Customizable – Adjust sweetness, coatings, and add-ins to your taste.
- More affordable – Making them at home is usually cheaper than buying pre-made versions.
Homemade Butterfinger Balls provide better control over quality and allow for endless variations.
Final Thoughts & Summary
Butterfinger Balls are an incredibly simple yet satisfying dessert. With just a few ingredients and no baking required, they are perfect for beginners and experienced bakers alike.
Why You Should Try This Recipe:
- Quick and easy with minimal ingredients
- Perfect balance of crunch and creaminess
- Versatile for different flavors and dietary preferences
- Great for make-ahead desserts, parties, and gifts
Once you make these, they will likely become a staple in your dessert rotation.
More FAQs
1. Can I use crunchy peanut butter instead of creamy?
Yes, but the texture will be less smooth. If you love extra crunch, crunchy peanut butter works well.
2. What if I don’t have Butterfinger bars?
You can substitute with crushed toffee bars, peanut brittle, or even graham crackers mixed with peanut butter.
3. Can I make Butterfinger Balls ahead of time?
Yes, they store well in the refrigerator for up to two weeks and in the freezer for three months.
4. How do I keep chocolate from melting at room temperature?
Using candy melts instead of regular chocolate helps prevent melting. Keep them refrigerated until serving.
5. Can I make these with white chocolate?
Absolutely! White chocolate gives them a sweeter, creamier taste and looks great with a peanut butter drizzle.
6. Are Butterfinger Balls keto-friendly?
Not as written, but you can modify them with sugar-free peanut butter, keto chocolate, and a sugar substitute.
7. Can kids help make these?
Yes! This is a great recipe for kids to help roll the balls and dip them in chocolate. Just be cautious with melted chocolate.
8. What’s the best way to crush Butterfinger bars?
A food processor is the easiest method, but placing them in a zip-top bag and crushing them with a rolling pin works well too.
9. Can I use almond butter instead?
Yes, but the flavor will be slightly different. Almond butter is a good substitute for those with peanut allergies.
10. Can I make these nut-free?
You can try using sunflower seed butter and a nut-free chocolate coating, but the flavor will change.